So, I've been buying more and more organic lately. After learning about all that crap in the food we eat, I feel embarrassed I didn't start sooner! The thing is though, organic is E-X-P-E-N-S-I-V-E! Like, a whole, whole lot more expensive. But, I do what I can here and there to trim so that we can buy the organic stuff and be good to our bodies.
That being said, the more and more I read about our food, the more and more I find myself really, really wanting to garden! BUT....I live in an apartment. A little two-bedroom-tiny-enough-as-it-is-no-room-for-a-garden-apartment. And the dogs use our patio all the time, so converting the patio to a garden is out too, even a portion of it since our puppy isn't yet trained to not dig up the dirt.
All that doesn't stop me though! No-sir-ee-bob! I want some garden fresh fruits and veggies and by George I WILL have them! So I bought some of that fancy organic dirt. I was going to try to compost my own, but I'm kinda impatient and I need to get those seeds in dirt like, now. And I bought some organic seeds. Just a few varieties to start out with. Spinach, rosemary, raspberries and tomatoes. As I said, since I don't have a house, I had to get creative with my planting efforts! I've been converting anything (really, anything) into planters. Candle holders we don't use anymore, old butter Tupperware dishes, pretty much anything I can put some fancy dirt and a few seeds in. One plant here, another there, and so on. I've lined my windowsills with the ones I've planted so far, and I'm even planning a trip up to goodwill this weekend to pick up a few more anything-can-be-planters.
I'm hoping this project goes well, I've never had a green thumb, but I'd really like to be able to grow something of my very own and eat it! (if this works out, watch out when we PCS and get into a house next year!!)
Thursday, July 21, 2011

Wednesday, July 13, 2011
Dresser is DONE!!
Just got back into town, and arrived to find the dresser knobs that I ordered! *yay* So of course I assembled them as fast as I could and moved the dresser into place!


For some reason, all the pictures are photographing much shinier then the dresser actually is, even so much so that I get a reflection of the orange couch in the background. Weird. Tried different lighting, positions in the room and even different camera settings, but to no avail. So here are the pictures of the dresser, mind you the knobs are actually black, and the dresser does not act like a mirror. Nor can you see the brush strokes on the dresser! Oh well, I'm really happy with the way it came out! Can't wait to piece the rest of the room together!!!
Again a before:
 And an after:


For some reason, all the pictures are photographing much shinier then the dresser actually is, even so much so that I get a reflection of the orange couch in the background. Weird. Tried different lighting, positions in the room and even different camera settings, but to no avail. So here are the pictures of the dresser, mind you the knobs are actually black, and the dresser does not act like a mirror. Nor can you see the brush strokes on the dresser! Oh well, I'm really happy with the way it came out! Can't wait to piece the rest of the room together!!!
Again a before:


Monday, July 04, 2011
Dresser-parts 1, 2 & 3
So this was officially a bigger project than I first anticipated.
That being said, I'm pretty much done. Waiting for the knobs I ordered to arrive, then I can get a finished picture up. I ended up ordered the knobs from Amazon. After browsing both Lowe's and Home Depot, they didn't have anything I just LOVED. Plus, even their standard knobs were over double the price of the same knobs on Amazon!! Plus, I get free shipping being a student and all. So, I'm hoping to get them before we head out of town on Thursday.
On to the process. First I needed to sand. I figured a pretty basic scratch up should do the trick, but it got detailed pretty quick. As I said, the dresser is old, and it needed a good bit of TLC put into it for me to get the finish product I desired. I also used some wood putty to fill in the holes, and gashes the dresser had as well as those country bumpkin-esk swirly things on the two top drawers. Here are some pics of the sanding and wood filling. Notice how bad the water stains were on the top, I thought sanding would help, but it only made them worse.
 Water-marked galore, huh?
 Filling in the swirls was pretty easy. I used Elmer's wood filler, and sanded after use. I used two coats here.
 All the drawers.
 More pictures of the water-damaged top!! Most of these marks you couldn't even see before sanding!

Notice the deep gash up the side that I had to fill in with wood filler....

Yeah, like I said, the dresser was in pretty bad shape.
I was planning to hand sand, since I try to do these types of projects for as cheap as possible, but since the sanding got so intensive, I ended up buying a power sander. I do like to build my tool set as I work on these, so I like to think of it as an investment. :)
Next up was the priming process. I wavered over which primer to use, oil-based or not. The oil-based dried quicker, but I was worried about the coverage, since I had so much I wanted to cover. So I chose non-oil-based primer.
 I originally tried painting outside, since I figured I didn't want to breath in fumes for the few days that I'd be painting, but apparently, wet paint+outside=bug trap. Yeah, I got lots of little friends to help me in my painting, maybe they thought I wanted some texture? Ha, so yeah, moved it inside, and didn't get any pictures of just the priming, since I had to do it in painting shifts. Plus, I added an extra layer of primer to the top to hide any extra nicks or dings or water-marks.
After I got it fully primed, I painted. I usually wouldn't paint the inside of the drawers, however, they were really dingy inside, and I wanted it to look like a piece I would have bought already black at a store.

 Two coats of paint, to be sure I was getting even coverage and a good solid black. The hardest part about the painting process was getting the brush strokes even.

 Here are a couple of the dresser after it's been painted, and the top coat applied. At first, I wasn't going to do a top coat, but I figured I wouldn't pay to get a manicure and not have them top of my nails with a top coat, so why would I put all of this time and effort into redoing the dresser to be just right and not protect my paint with a top coat?
 I used a fast-drying polyurethane by minwax. I know there are other kinds, and I looked for the rub-on kind, but didn't see any. The top-coat required a natural bristle brush which was also a bit hard to find, but I did eventually find one. :) After cleaning with the top coat, I ran into a bit of a snag. You're supposed to clean this stuff off the brush with mineral spirits. I hadn't planned for that, and didn't have any. Luckily, they carry the stuff at wal-mart and my WONDERFUL husband ran out and bought a bottle for me. At 10 o'clock at night. Yeah, I love that man!

Yeah, there's wine in the background. There might have been some wine involved in this project on a few phases. ;)
Now, all the protective coat has been fully applied, waiting for it to fully dry (dries in 3-4 hours for touch and 24 hours for light use) and for my hardware to come in. Here are a few pics of the dresser in it's final drying stages before the hardware comes in.
The top two drawers have fully dried, so they're back in the dresser to save on some space. :)
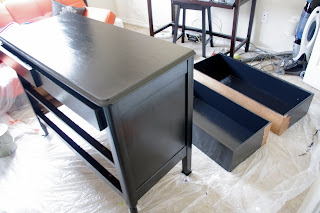 Here you can see the bigger drawers behind the dresser.
 A close up of the interior of the bigger drawers. Yeah, I primed, painted and top-coated those as well. Just for good measure. :)

And one of the whole sha-bang. Now if only I had my hardware to put it all back together!! Can't wait!!!
That being said, I'm pretty much done. Waiting for the knobs I ordered to arrive, then I can get a finished picture up. I ended up ordered the knobs from Amazon. After browsing both Lowe's and Home Depot, they didn't have anything I just LOVED. Plus, even their standard knobs were over double the price of the same knobs on Amazon!! Plus, I get free shipping being a student and all. So, I'm hoping to get them before we head out of town on Thursday.
On to the process. First I needed to sand. I figured a pretty basic scratch up should do the trick, but it got detailed pretty quick. As I said, the dresser is old, and it needed a good bit of TLC put into it for me to get the finish product I desired. I also used some wood putty to fill in the holes, and gashes the dresser had as well as those country bumpkin-esk swirly things on the two top drawers. Here are some pics of the sanding and wood filling. Notice how bad the water stains were on the top, I thought sanding would help, but it only made them worse.


Notice the deep gash up the side that I had to fill in with wood filler....


Yeah, like I said, the dresser was in pretty bad shape.
I was planning to hand sand, since I try to do these types of projects for as cheap as possible, but since the sanding got so intensive, I ended up buying a power sander. I do like to build my tool set as I work on these, so I like to think of it as an investment. :)
Next up was the priming process. I wavered over which primer to use, oil-based or not. The oil-based dried quicker, but I was worried about the coverage, since I had so much I wanted to cover. So I chose non-oil-based primer.

After I got it fully primed, I painted. I usually wouldn't paint the inside of the drawers, however, they were really dingy inside, and I wanted it to look like a piece I would have bought already black at a store.


Yeah, there's wine in the background. There might have been some wine involved in this project on a few phases. ;)
Now, all the protective coat has been fully applied, waiting for it to fully dry (dries in 3-4 hours for touch and 24 hours for light use) and for my hardware to come in. Here are a few pics of the dresser in it's final drying stages before the hardware comes in.


And one of the whole sha-bang. Now if only I had my hardware to put it all back together!! Can't wait!!!
Tuesday, June 28, 2011
Dresser Re-Do
So, we got our guest room back! *happy dance* Lovely fellow we had staying with us, but I was planning what I'd do with the room when we got it back. As I've said, it needs to be functional as a guest room, but without being a bedroom all the time. Since we won't use it as a bedroom. So, we decided to make it a guest/craft/xbox 360/etc.... room! Sounds like a lot, but, I've come up with a way to get it all in there, without looking too cluttered and still have it be useable! (yeah, I know, I'm a genius, right?)
So...first things first. We have this old, boring, brown, water-marked dresser. It's like, really, really old. But, it's a smaller dresser, that's perfect for a not-all-the-time guest room, with perfect storage for my sewing supplies and various other second bedroom fare. Plus, it serves as the TV stand for the xbox 360. (My husband gets mad when I play xbox and hog the living room, since it's all motion activated)
I started the dresser re-do part of the guest room re-do today, and I thought I'd post a few before pictures to show you what I'm working with here.


 Just loverly, right?? Ugh! And it doesn't just need cosmetic work, it needs a full on re-do! I'll be re-attaching the drawers, as the bottoms give way a bit, and I'll be getting rid of that nice little country-esk ridge on the top drawers as well. The 2nd room is going to have a much more modern, chic yet retro vibe to it when it's all said and done. I'm hoping to have this project done by Sunday, (have to work it around my homework schedule...ugh) so I should be posting more pics by then.
P.S.-No, my shadow is not posing in that middle picture, I am just taking a picture....maybe I vogue naturally??
So...first things first. We have this old, boring, brown, water-marked dresser. It's like, really, really old. But, it's a smaller dresser, that's perfect for a not-all-the-time guest room, with perfect storage for my sewing supplies and various other second bedroom fare. Plus, it serves as the TV stand for the xbox 360. (My husband gets mad when I play xbox and hog the living room, since it's all motion activated)
I started the dresser re-do part of the guest room re-do today, and I thought I'd post a few before pictures to show you what I'm working with here.


P.S.-No, my shadow is not posing in that middle picture, I am just taking a picture....maybe I vogue naturally??
Monday, June 13, 2011
Easy Fabric Storage Box
So I'm redoing my craft/workout/extra bedroom. We had a friend that had been staying with us, so once we got the bed out, I've been manically clearing/cleaning/re-doing pretty much the whole thing. Both of my husband's kids are coming this summer (yay! that itself is big progress), but we don't want to have a full extra room set up for the whole year when they would only be here a few weeks out of the year. We would get much more use out of making it a craft/workout/extra bedroom. So we ordered this perfect orange futon. More to come on the 2nd room later....but in the meantime, my motif is going to be orange, black and silver with a modern and retro vibe to it. Hard to explain, but it looks so pretty in my head! Well, I've been searching high and low for inspiration on how to get everything I want out of the room without making it feel to cluttered.....and it needs to be able to be useful (a/k/a not have everything shoved into the closet). So, I found this photo a-la pinterest (side-note, if you're not on pinterest, why the hell not??!).
 I LOVE the shelves. The room actually, but there's no way I could fit that into my room with everything else that needs to be accomplished. So, I decided on some floating shelves for our 2nd room. The only problem is, my craft stuff is kind of a mess. I have various things stuffed in old mis-matched shoe boxes and I definitely don't want to spend a small fortune on new storage ware. But there's no way I'm putting my craft stuff on display the way it is now. Then I had a brilliant thought! I decided to cover my old shoe boxes that I use for storage with some fabric! This is a few pics of the first one, I did it with some spare zebra striped fabric I had for another craft a while back. Not my favorite fabric, but I didn't want to waste the good stuff should this not work.
Supplies:
old shoebox
spray adhesive (any will do actually, I used spray adhesive because that's what I had on hand)
fabric
scissors
This is a really easy project, only took me about 20 minutes start to finish which included gathering up all my supplies.
First, you start with the old shoebox:
 Then you grab your fabric:
 Then I started with the lid, spraying the part of the box I wanted fabric to stick to, and slowly worked my way around.


I worked my way around, and folded everything in, being sure to not leave too much fabric at the top, so the top of the box would still fit on. Once I got everything glued just the way I wanted it, I trimmed the excess fabric off, let it dry completely (so I wouldn't have a glued-shut box) and wha-la! I'm very pleased with the way it turned out! I'm going to do this with all of my storage shoe-boxes in all black and white fabric so they can cutely coordinate with the rest of the room all while being in reach for me to grab whenever I feel the need.
 Now I just need to figure out a labeling system.......

Supplies:
old shoebox
spray adhesive (any will do actually, I used spray adhesive because that's what I had on hand)
fabric
scissors
This is a really easy project, only took me about 20 minutes start to finish which included gathering up all my supplies.
First, you start with the old shoebox:


I worked my way around, and folded everything in, being sure to not leave too much fabric at the top, so the top of the box would still fit on. Once I got everything glued just the way I wanted it, I trimmed the excess fabric off, let it dry completely (so I wouldn't have a glued-shut box) and wha-la! I'm very pleased with the way it turned out! I'm going to do this with all of my storage shoe-boxes in all black and white fabric so they can cutely coordinate with the rest of the room all while being in reach for me to grab whenever I feel the need.

Monday, May 23, 2011
Someone Stuck Me!!!
With a needle that is! Many, many times.
I mean, I did ask....and pay.....the guy to do it. But you know, it still wasn't all that fun. The end result however......is BEAUTIFUL!!!
 I just LOVE it!!! I'm even entering it into a tattoo convention this upcoming weekend. :) Keeping my fingers crossed.
I mean, I did ask....and pay.....the guy to do it. But you know, it still wasn't all that fun. The end result however......is BEAUTIFUL!!!

Wednesday, April 27, 2011
The Diamond Tufted Headboard....The "Reveal"
So this was a longer process than I thought. Turns out, there are good and bad ways of attaching or hanging your headboard to the wall. Since we live in an apartment, hanging the headboard from the wall=bad. Mainly because of the size of the holes and type of hardware that it would require in order to securely hang the headboard from the wall. So, attaching the headboard to the frame became the option. This is fairly easy, once you know what you're doing (which I did not). You find a few 2x4's. Drill holes to match up to the frame, secure the 2x4's to the bed frame and then attach the headboard to the 2x4's. Or can attach the headboard first. Either way, really. Just make sure you check the lines & ensure that the headboard is straight!
The reason the reveal was such a long process was because I decided I needed to find better sheets & paint before I put up pictures for the "after" for all to see. No way was I going to show a half-assed picture after all the hard work I had put in!
So I painted. :) Oh, and I bought new sheets. In the opposite order actually. Bought sheets first, then painted. I'm still not 100% done.....I'm waiting on a few Chinese lamps to arrive and I think I might paint the wall with the windows, but at least I am done with the headboard!!
 Close up :)
And a full-room shot...
 And a few more:

 She was just so curious! lol, couldn't seem to understand why I was on the floor, but didn't want to play with her!
The reason the reveal was such a long process was because I decided I needed to find better sheets & paint before I put up pictures for the "after" for all to see. No way was I going to show a half-assed picture after all the hard work I had put in!
So I painted. :) Oh, and I bought new sheets. In the opposite order actually. Bought sheets first, then painted. I'm still not 100% done.....I'm waiting on a few Chinese lamps to arrive and I think I might paint the wall with the windows, but at least I am done with the headboard!!

And a full-room shot...


Subscribe to:
Posts (Atom)